Video: Stencils vs. Templates
What are the differences between stencils and templates in OmniGraffle for Mac?
OmniGraffle 7.5 update brings Omni Automation improvements and additions
In OmniGraffle 7.5 for Mac, new automation features are introduced, a whole lot of functions and classes are improved, and a lot of bugs are vanquished.
The release notes give all the details, but this is a big release if you’ve been working with (and sending feedback on—thanks, if that’s you!) Omni Automation.
As an aside, feel free to share your scripts and quick workspace improvements that Omni Automation brings to OmniGraffle—we’re working on a better way to share them, but if it’s worth sharing with others, let us know! We’d love to share it here and elsewhere.
OmniGraffle 3.2 for iOS 11
Last week saw the release of iOS 11, and with it, the release of OmniGraffle 3.2 for iOS. The release was a major update with brand new functionality for OmniGraffle featuring Drag and Drop in different areas of the app, as well as integration with the new Files app.

Here’s the new stuff. For full release notes, head here.
- Drag and Drop Content to OmniGraffle — Quickly add to an OmniGraffle document by dragging content from another app to OmniGraffle’s Canvas or Navigation Sidebar. Drop images or text on the Sidebar to position them exactly in the object hierarchy or on the canvas to position them just right visually.
- Drag from the Canvas — Quickly share graphics with others by lifting a selection directly from the OmniGraffle canvas and dropping on another canvas, a separate OmniGraffle document, or a different app altogether!
- Drag from the Navigation Sidebar — OmniGraffle supports dragging content from the Navigation Sidebar: Pick up canvases, layers, or individual objects to rearrange them in the sidebar list or drag them to another app. Drag a canvas to the Photos app to quickly export an image of that canvas or drag a layer to the Mail app and the objects on that layer are shared with a transparent background. You can drag a selection of objects to share just those shapes and if you share an artboard object then the objects above the artboard are included.
- Drag and Drop in the Document Picker — The Document Picker supports Drag and Drop to make document management even easier. Drag files in to quickly import them, drag them out to copy them elsewhere, or pick up a group of documents and add them to a folder in the Document Browser to keep all your projects organized.
- Files App Integration — Local OmniGraffle documents appear in the “On My iPad” section of the Files app and OmniGraffle documents in iCloud can be opened in place for editing.
Creating your first cross-platform Plug-In in OmniGraffle
Just recently introduced in OmniGraffle 3 for iOS and OmniGraffle 7.4 for Mac, Omni Automation exposes a brand new interface of OmniGraffle. Powered by JavaScript, users will be able to create, bundle, and share Plug-Ins to use on both platforms. Putting together simple actions that benefit your own workflow should be approachable for advanced coders and beginners alike.
Our hope is that within a year or two there will be a thriving assortment of Plug-Ins that perform all kinds of tasks, automatically, with a little help from a toolbar button.
This is an introduction to the world of Omni Automation: we’ll cover how to write the code necessary to generate Lorem Ipsum text, how to bundle it up as a Plug-In, and how to share that Plug-In with OmniGraffle for iOS and others.
Getting started with JavaScript and Omni Automation
In both OmniGraffle for Mac and iOS, we’ve added a Console that allows you to directly interface with your canvas (and all aspects of your document) by entering lines of code. For starters, let’s just see which version of OmniGraffle is installed: select Show Console via the Automation menu and type `app.version`. Hit return, and you’ll see OmniGraffle’s version number—that’s it. We didn’t really accomplish much, though, so let’s add a shape to the canvas!
Copy and paste this line:
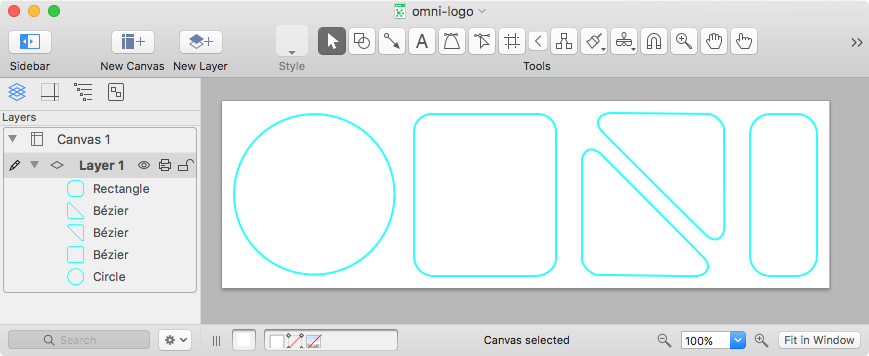
document.windows[0].selection.canvas.addShape('Circle', new Rect(0,0,200,200))
You’ve just added a new, 200 x 200 pixel circle the current canvas.
If we went one step further and assigned that object a variable name, we could make changes to the same object by referencing CircleOne:
CircleOne = document.windows[0].selection.canvas.addShape('Circle', new Rect(0,0,200,200))creates a new ShapeCircleOne.strokeThickness=5changes the stroke thickness from1to5CircleOne.geometry = new Rect(100,100,200,200)changes the X and Y origin to x = 100 and y = 100
And that’s….pretty easy! You can find more documentation about Objects, rects, and everything else by selecting API Reference via the Automation menu.
Starting up the script!
Let’s move on to creating our script that generates random Lorem Ipsum text. To keep everything in one spot, create a new file in your favorite text editor. The Plug-In we’re going to create is going to take a selected object—some sort of shape, whether it’s a square or circle or star—and add random bits of text as filler. Commonly, that’s Lorem Ipsum text and it helps facilitate a better-looking mockup.
First, we need to generate some of that Lorem Ipsum stuff. With the help of lukejacksonn’s Lorem.js, it won’t take long. I wrapped it up in the loremIpsum() javascript function below.
function loremIpsum() {
// Amount of words required
var length = 30;

// Helper functions
var charAtEndOfOut = function(char, step) {
return out.indexOf(char, out.length - step - 1) !== -1;
}
var randomWord = function() {
return words[Math.floor(Math.random() * (words.length - 1))];
}
var capitalize = function(word) {
return word[0].toUpperCase() + word.slice(1)
}

// Dictionary of words
var paragraph = "Lorem ipsum dolor sit amet, consectetur adipisicing elit, sed do eiusmod tempor incididunt. ut labore et dolore magna aliqua. Enim ad minim veniam, quis nostrud exercitation ullamco laboris nisi ut aliquip commodo consequat. Duis aute irure dolor reprehenderit voluptate velit esse cillum dolore eu fugiat nulla pariatur. Excepteur sint occaecat cupidatat non proident, sunt in culpa qui officia deserunt mollit anim est laborum.",
words = paragraph.split(" "),
word = "",
out = capitalize(randomWord());

for (var i = 1; i < length; i = i + 1) {
//Select random word from paragraph
word = randomWord();
out += " ";

//Append to out, capitalize first letter if necessary
out += (charAtEndOfOut('.', 1) || charAtEndOfOut('?', 1)) ? capitalize(word) : word.toLowerCase();
}

//Append full stop to the end of string, strip punctuation if necessary
out = (charAtEndOfOut('.') || charAtEndOfOut(',') || charAtEndOfOut('?')) ? out.slice(0, -1) + "." : out + ".";

return out;
};
Next, after the function, we need to get the details of the currently selected object:
currentObject = document.windows[0].selection.graphics[0]But! We still need to make sure we’re adding text to the selected object. After currentObject = document.windows[0].selection.graphics[0], add this line:
currentObject.text = currentObject.text + loremIpsum()
That line adds the random text to the object, but also adds it after any text already in the object. (So if you need to fill up a super big text box, just keep on activating the script.) You can test the script by copying everything in that script file and pasting it into OmniGraffle’s Console.
Now we just have to bundle everything up into another—special—function before adding it to OmniGraffle as a Plug-In. We only want OmniGraffle to do something with our script when we have an object selected, so let’s wrap everything inside this bit of code that tells the app “I’m only used with a selected object.”:
var _ = function(){
var action = new PlugIn.Action(function(selection){
// if called externally (from script) then generate selection object
if (typeof selection == 'undefined'){selection = document.windows[0].selection}


// Insert entirety of the script here.

});

// Optional validation function. Omit to always return true.
action.validate = function(selection){
// if called externally (from script) then generate the selection object
if (typeof selection == 'undefined'){selection = document.windows[0].selection}
// status check, such as are graphics selected?
if (selection.graphics.length > 0){return true} else {return false}
};

return action;
}();
_;
Creating a shareable Plug-In
OmniGraffle requires a specific set of assets before recognizing a Plug-In as legitimate. At the very least, we’ll need to create a new folder with a barebones manifest.json file, a simple icon for the toolbar, and the script. (Plug-Ins can also be localized; for full details, visit Sal’s page on Plug-Ins.)
Let’s start with the manifest.json file, which lives inside the folder you just created:
{
 "author": "Omni Group",
 "identifier": "com.derekreiff.lorem",
 "version": "0.5",
 "description": "Add Lorem Ipsum text to a selected object.",
 "actions": [
   {
     "image": "loremipsum.png",
     "identifier": "loremIpsum"
   }
 ],
 "defaultLocale": "en"
}
Super easy! There’s an author, an identifier, a version number, description, and the action itself: the image is for a toolbar button, and the identifier is the name of the javascript file (minus the .js) for the action. (Technically, what we just wrote is in action.)
With the manifest.json file in place, create another folder: Resources. Drop in the JavaScript file you created, along with an icon file (appropriately named)!
Finally, rename the folder to loremipsum.omnigrafflejs. This tells macOS the thing you’ve just created is a Plug-In that OmniGraffle should open. Double-click it and you’ll have a pretty darn useful Plug-In installed! Customize your toolbar, looking for the appropriate action & icon, and then try it out with an object selected.
Adding the Plug-In to OmniGraffle 3 for iOS
First, make sure you’re running OmniGraffle Pro. Try sending the Plug-In over to your iPad or iPhone via AirDrop; that’s pretty easy. You can also sync it over via OmniPresence. OmniGraffle will ask if you’re sure, but we’re sure!

Have ideas for Plug-Ins? Created any? Tell us all about them!
Creating custom inspectors
You’re ready to optimize your workflow for a very specific document. You only need your Shape, Stroke, and Fill inspectors; everything else should be hidden, and you’re going to hide both Sidebars. Creating a custom, floating inspector is easy:
First, drag out the Fill inspector by selecting the drag handle just to the right of the inspector’s title, then dragging it anywhere to the left of the sidebar’s boundary.
Second, drag each additional inspector to the new, floating inspector. Resize to your liking, and then minimize the sidebar by dragging the very left edge all the way to the edge of the window.
That’s it! A bespoke inspector. If you have Pro installed, you can save this setup to access whenever you’d like: check out Inspectors➞Edit Workspaces.
Use Small Icons on Mac for a data-dense Unified Sidebar
By default, OmniGraffle 7 for Mac will show previews of each Canvas in a document. It’s useful to get an instant visual on the Canvas’s contents, but some prefer to fit as much data on the screen as possible for larger documents.
To switch over to small icons to represent your canvas, Control-click anywhere in the Sidebar and select “Use Small Icons” from the shortcut menu.
![]()
The result will put quite a few more Canvases in view.
![]()
Paste SVG directly into OmniGraffle as native objects
In OmniGraffle for Mac and iOS, you can paste SVG code directly onto your canvases. From files, from the Safari or Chrome Web Inspector, using “Copy as SVG” from another Graffle file: if it begins with an SVG tag, OmniGraffle can work with it. Then you can bend, modify, or remix.
Looking at a specific object in Safari? Try dragging the image to your OmniGraffle for Mac Dock icon. If it’s not behaving like a normal image, use Safari’s Web Inspector to expose its source:
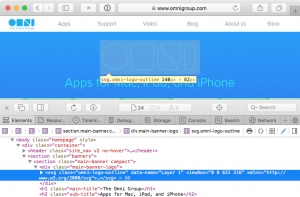
With the SVG selected, hit Command-C. That’s it! Now just paste it right into OmniGraffle.
The CMD-D conference looks great…and features Omni Automation!
A lot of our friends will be there, and we’re a sponsor! You can save 30% off on any ticket by using the code OMNIROCKS. We think you’ll like it, and you’ll learn more about our cross-platform JavaScript automation we included in both OmniGraffle 7.4 for Mac and 3.0 for iOS!

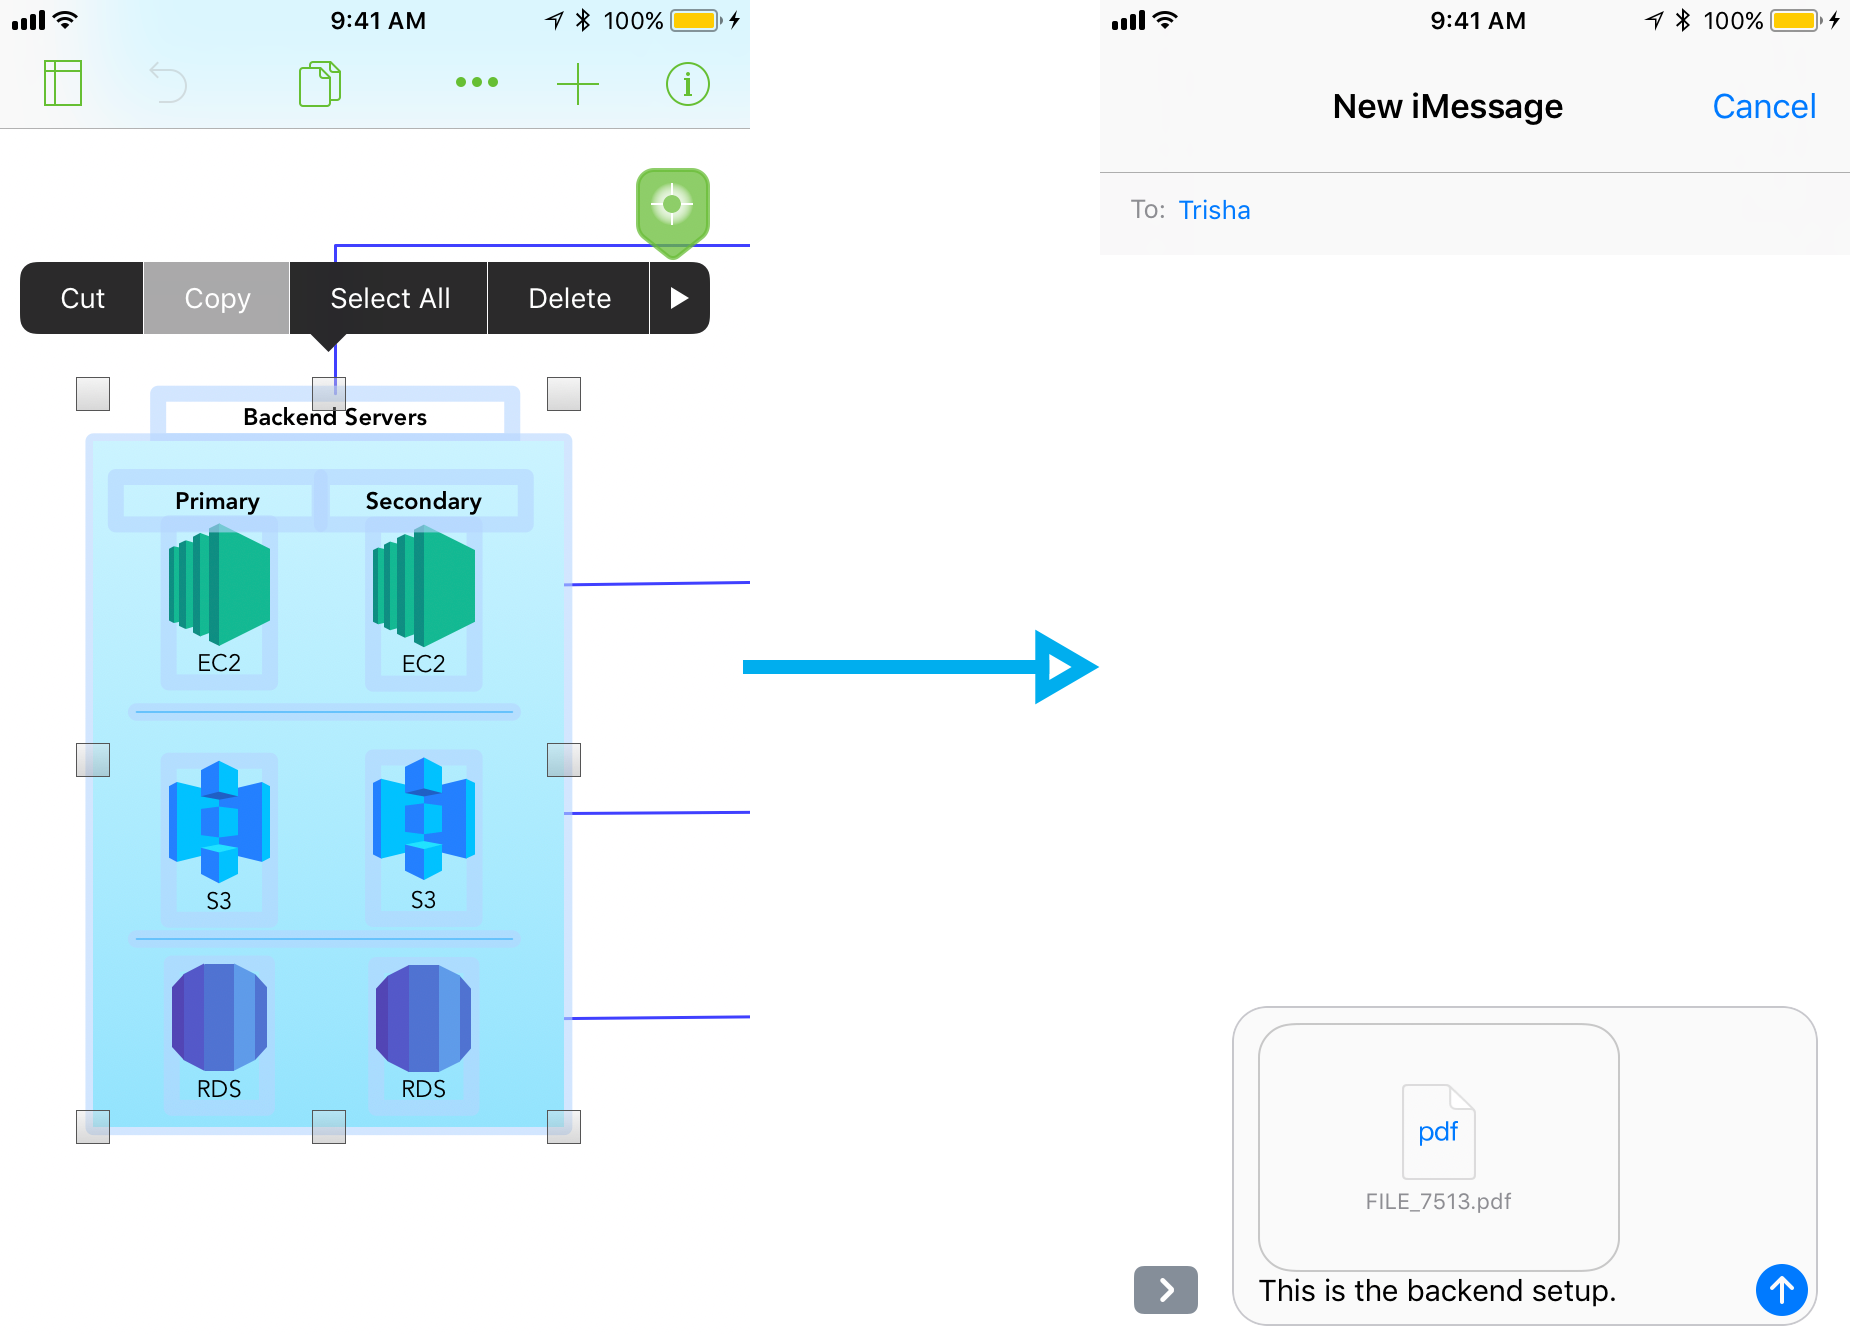
Share a selection of objects from a canvas
Have a portion of a Canvas that needs sharing without everything else? In OmniGraffle, it’s easy to quickly share a PDF of only a few of your document’s objects. Use the Selection Tool to highlight exactly what you want, then bring up the Context menu by tapping on one of the selected objects.
Tap Copy, and then paste the resulting PDF in the app of your choice!
It even works with iCloud Copy and Paste across your devices: Copy in OmniGraffle 3 for iOS, then paste into a document on your Mac!